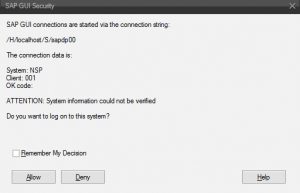
We all have seen this screen, from time to time. Well maybe not this exact version, but a least a variant of it.
Everytime SAP GUI interacts with our local PC outside the SAP Logon framework, we get a version of this, but usually, we just check the “Remember My Decision” and press “Allow“, for next time.
But what if we don’t want our users to be bothered with these kind of decisions?
Maybe we have created a solution or a shortcut that calls for a specific functionality in the SAP Guide. When we roll out this solution, we may not want to ask our end-users to allow or deny access.
Why do we need the security rules in the SAP GUI ?
So why do we need this security model for the SAP GUI, when SAP has a fully-fledged Security model with roles and profiles that protect our systems and our data in the backend?
Well, the purpose here is not to protect the SAP System. It’s actually to protect you, the user and your laptop from a potentially corrupt SAP System. Let me quote the “Security guide for SAP GUI for Windows”
“The SAP GUI security module was implemented to protect the user’s local environment against undesired actions that a potentially corrupt SAP system could trigger on his or her PC. The possibilities for the back-end system to control the client PC are fundamentally desirable and they make using the SAP system significantly easier. However, with the appropriate manipulation, they could also potentially be misused to run undesirable or destructive commands on the PC(s) of one or more end users. This could, for example, lead to the uncontrolled deletion of files, or an attacker gaining control of the PC.”
As a security consultant I can certainly appreciate this, but as a mere consultant, it of course is trivial to work with this behaviour.
However, I can also understand the end user’s perspective here and I admit it could be both frustrating costly, as support requirements may increase when users press “deny” and “remember this selection” – and then suddenly find themselves in a situation were they can’t execute a certain business process the way they should.
How does it work ?
The SAP GUI security module protects your pc from actions performed by the backend system, and comes up with three status levels:
1. Disabled: You have the option to disable the SAP GUI security model all together. If you do this, all requests from the backend system will be executed immediately. However, this setting is not recommended! as this could put the laptop and your data at risk.
2. Strict Deny: You also have the option to block the execution of all security related actions. Basically this prevents the SAP System from interacting with your local PC. This is quite secure but not very practical.
3. Customized: This is the default setting and the practical one . When this option is selected, SAP searches the list of rules for the first applicable one. Once that is found, it’ll be applied and the search will be terminated. NB: Rules created with a lower priority that also apply will not be evaluated.
SAP GUI Security Rules
When you have chosen to use the Customized status in the security module, SAP evaluates the rules in order of priority. These rules can be defined on three different levels:
- A rule set is delivered as part of the SAP GUI. These rules have the highest priority and it is not possible to edit them.
- A rule set that can be delivered by your system administrator. As with the SAP delivered rules, these can be changed by the end user.
- A rule set that you can maintain your self.
All rules are defined with a priority and they are tested sequentially, based on the priority order. When an applicable rule is found, then that rule is executed and further processing is stopped.
The SAP Standard rule set is included in the SAP GUI. Your own rule set is stored in the rules.xml file “%APPDATA%\SAP\Common” directory.
Adjusting the rule set
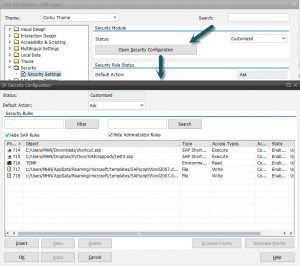
You can display and adjust the rule set from within the SAP Logon ->Options->Security -> Security Settings by pressing the “Open Security Configuration” button.
In here, you can get an overview of all the rules that apply to your installation.
The SAP Standard rules and the Administrator rules are hidden by default. If you want to see them, just uncheck the “Hide SAP Rules” and the “Hide Administrator” check boxes.
Whenever you get a Popup like the one on top of this blog post, and you check “Remember My Decision” – a rule is added to this list.
You can change or delete it from within this dialog. If you add or edit your own rule set, remember to enable them, otherwise they won’t be active.
Context Dependent rules
In addition to the General action like “Ask” or “Deny”, you also have the option to create “Context-Dependent” rules like the one shown to the right.
By defining a context specific rule, you can limit the rule to a specific system or network.
In the example here, the call of transaction SO01 form the shortcut is allowed on the NSD System, but not allowed at the NSP. (Can you please revise this line?)
Distributing the rules
If you want to create and distribute a rule set, then just create a ”local” one with the tools mentioned above, then copy this to a location on a server (or distribute it to the local PC’s).
Note: Do not replace the saprules.xml file in the installation directory ! It will be overwritten when you upgrade the SAP GUI.
Now you need to adjust the entry in the registry of the local pc’s (these settings can naturally be distributed as well).
You need to find “[HKEY_LOCAL_MACHINE\Software\SAP\SAPGUI Front\SAP Frontend Server\Security]” entry on windows 32 bit, on windows 64 bit you should use this entry “[HKEY_LOCAL_MACHINE\SOFTWARE\Wow6432Node\SAP\SAPGUI Front\SAP Frontend Server\Security]“.
This is where you can create a REG_EXPAND_SZ value “Location” and can you specify the path to the central file. Don’t enter the file name as it must always be – “saprules.xml”.
There’re a couple of other entries you can make in the repository in order to control the behaviour of the security rules, these are described in detail in chapter 2.5 in the “SAP GUI Security Guide for Windows“


